torch.fx源码剖析 02 -深入理解 TORCH.FX
torch.jit.trace 和 torch.fx 的区别:
- 目的和使用场景:
- torch.jit.trace: 主要用于将动态 PyTorch 模型转换为静态 JIT 模型。
- torch.fx: 对 PyTorch 模型进行符号级别的分析和转换。生成的 GraphModule 用于各种图优化和变换。
- 输入格式:
- torch.jit.trace: 需要一个具体的输入来跟踪模型的执行。
- torch.fx: 不需要输入,基于模型的定义进行符号级别的分析。
- 生成的中间表示:
- torch.jit.trace: 生成一个 torch.jit.ScriptModule,它是 PyTorch JIT 编译器的输入。
- torch.fx: 生成一个 torch.fx.GraphModule,包含一个 torch.fx.Graph对象,表示模型的符号级别表示。
- 额外功能:
- torch.jit.trace: 提供对 JIT 编译器的各种优化选项和控制,如融合、常量折叠等。
- torch.fx: 提供了更丰富的图转换和分析功能,如自定义 pass、图遍历等。
1.简介
fx 模块包含以下特性:
-
采用trace的方式去捕捉神经网络结构(通过
Tracer类和Proxy类)。fx 模块与 jit.trace 不同,前者将输入替换为Proxy做追踪,后者基于样例输入做追踪 ,因此 fx 不会对输入做特例化。 -
fx 不支持动态控制流,即与输入相关的控制流,在 IR 中不包含控制流指令;fx 也不支持可变状态和别名,例如
x是一个tensor,y=x[i]并没有新创建一个 tensor ,而是x的一个 view ,为了支持这种可变特性,需要设计非常复杂的 IR 并且做复杂的安全分析。
这种设计可行吗?实际上随着 transfomer 的提出,循环神经网络逐渐被替代,主流神经网络中的动态控制流越来越少,更多只是简单的序列输入输出。对于复杂的需求,用户可以通过重新定义 Trace 类或者 Proxy 类来实现(例如 Trace 类的 is_leaf_module 方法可以被重写,定义哪些 Module 不应该被拆开跟踪内部的计算和调用)。
- 将变换后的 IR 转为可运行的 Python 代码(更准确的说是一个 Python 函数对象)。
2.FX 源码解析
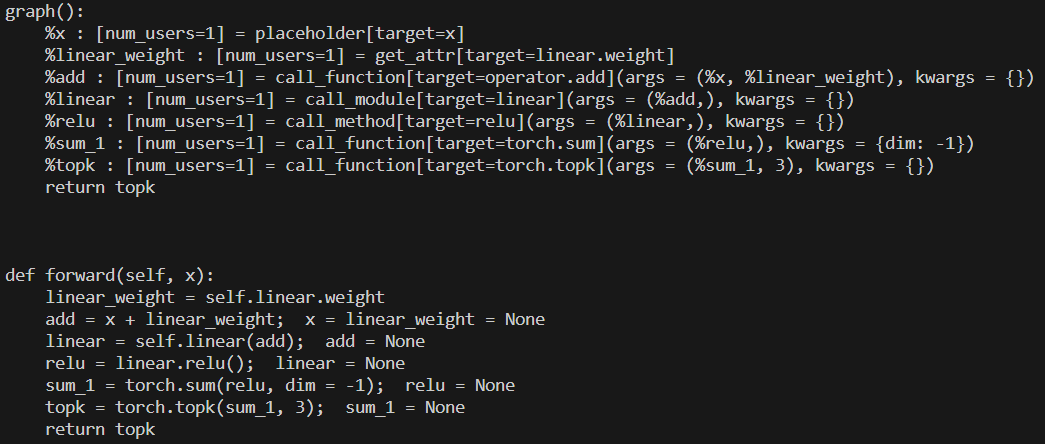
2.1示例:
import torch
import torch.fx

class MyModule(torch.nn.Module):
    def __init__(self):
        super().__init__()
        self.param = torch.nn.Parameter(torch.rand(3, 4))
        self.linear = torch.nn.Linear(4, 5)

    def forward(self, x):
        w = self.linear.weight
        x = x + w
        x = self.linear(x)
        x = x.relu()
        x = torch.sum(x ,dim=-1)
        x = torch.topk(x, 3)
        return x

m = MyModule()
gm = torch.fx.symbolic_trace(m)
print(gm.graph)
print(gm.code)
这段代码中:
- 定义了 MyModule 类,
- 通过 torch.fx.symbolic_trace 对该类的实例 m 进行 fx 追踪,返回 gm 。
- gm 是GraphModule 类的实例,GraphModule 继承自 Mudule ,可以直接当做 Module 使用。gm 所定义的计算行为与 m 完全一致,几乎可以在所有场景使用 gm 替代 m。 gm 有两个重要的属性,一个是 graph ,另一个是 code。
2.1.1.graph
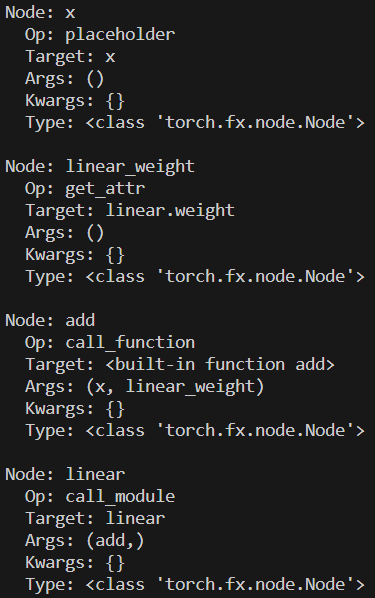
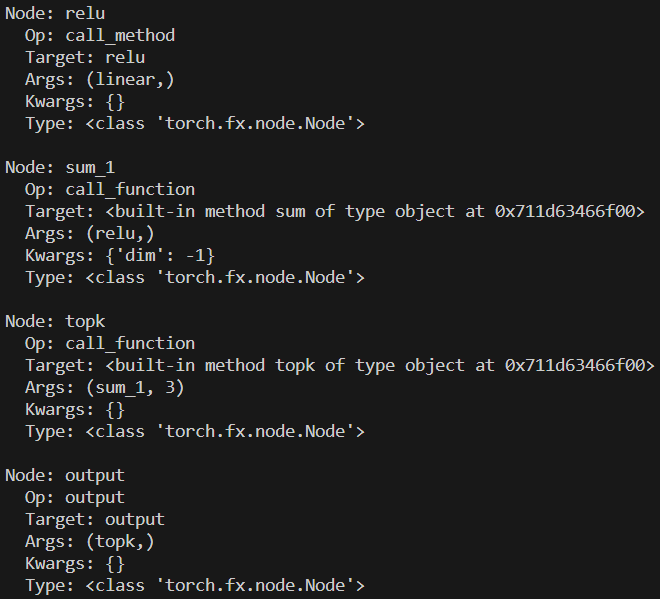
torch.fx.graph.Graph类的实例,也就是经过 fx 追踪后的 m 对应的计算图,计算图由一组节点( torch.fx.node.Node)组成,可由GraphModule.graph.nodes访问。
2.1.2.node(IR)
每个节点是一条 IR ,记录了节点的输入参数和计算行为(调用函数,方法,模块等),每个节点都有五个属性:
- opcode :节点种类的标识,我们前面提到 fx 模块总共只有 6 条 IR ,包括 placeholder ,get_attr ,call_function ,call_module,call_method,output。
- name :每个节点的名字,与调用的对象相关。
- target :每个节点调用的对象,可以能是函数,方法,属性或模块。
- args :每个节点的可变参数。
- kwargs :每个节点的可变关键字参数。
for node in gm.graph.nodes:
    print(f"Node: {node.name}")
    print(f"  Op: {node.op}")
    print(f"  Target: {node.target}")
    print(f"  Args: {node.args}")
    print(f"  Kwargs: {node.kwargs}")
    print(f"  Type: {type(node)}")
    print()
2.1.3.IR对应的语义
- placeholder:函数输入。
- name:此变量将采用的名称。
- target:参数的名称。
- args: 1. 空。 2. 函数输入的默认值。
- kwargs:无用。
- get_attr:从模块层次结构中检索参数。
- name:结果的名称。
- target:参数在模块层次结构中的位置的完全限定名称(如my_module.MyClass.my_attr)。
- args 和 kwargs:无用。
- call_function:将独立的函数应用于某些值。
- name:名称。
- target:是要应用的函数。
- args 和 kwargs:函数的参数,遵循 Python 调用约定。
- call_module:将模块的 forward() 方法中的模块应用于给定参数。
- name:如前。
- target:要调用的模块的完全限定名称。
- args 和 kwargs:调用模块的参数,不包括 self 参数。
- call_method:调用一个值的方法。
- name 如前。
- target:应用于 self 参数的方法的字符串名称。
- args 和 kwargs:调用方法的参数,包括 self 参数 。
- output的args[0] 包含被跟踪函数的输出。对应计算图中的 return 语句。
2.1.4.code
模型经过 fx 追踪后生成计算图,计算图的只是一组 IR ,无法直接运行的。
因此 fx 会对 IR 做代码生成,生成python 源代码。
这样又回到了 python 运行时,方便用户调试和使用。
具体来说, fx 会生成一个函数对象,然后绑定到 gm 的 forward 方法上,而 code 属性就是 forward 方法对应的 python 源代码。
然后执行gm即可,作为执行原module的替代。
2.2.计算图生成
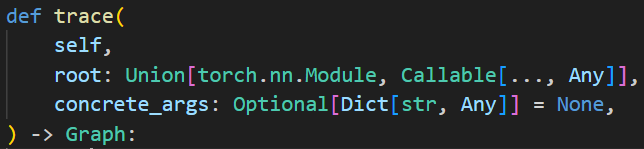
前面调用的是torch.fx.symbolic_trace,定义在pytorch/torch/fx/_symbolic_trace.py#L1169
注释中提到:无法直接追踪含有控制流的情况,但可以通过concrete_args()部分专门化函数,去除控制流。


主要功能:
- 创建 torch.fx.Tracer,进行简单的初始化;
- 调用 trace() 来捕获 torch.fx.Graph;
- 创建 torch.fx.GraphModule;
Trace.trace()
2.2.1.初始化被追踪模块与函数
#L717:
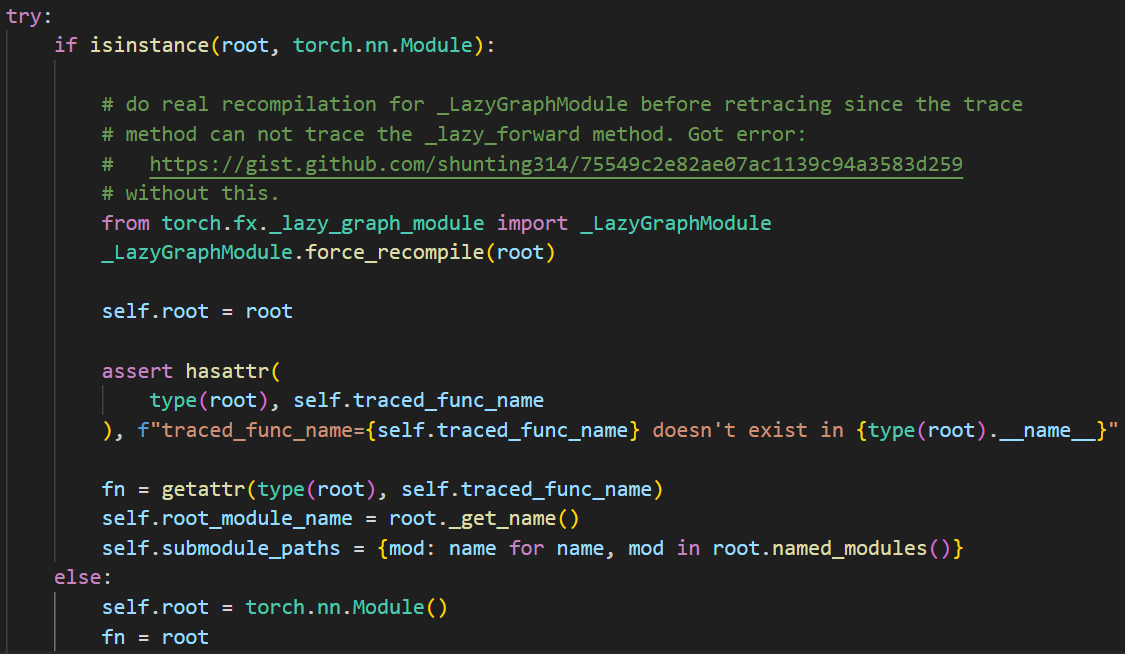
如果传入的是一个LazyGraphModule,就会强行将其编译,因为它已经被优化过,但是没有实际上编译。
如果传入的是普通的nn.Module,就会查看是否有”forward”方法(即traced_func_name),并将fn设置为forward的引用。
如果传入的不是nn.Module,就说明传入的是独立的函数,创建空的nn.Module并填写信息。
Dynamo 的主要工作就是通过 JIT 编译将有分支的模型划分成多个无分支的子图,然后再交给 Tracer 进行编译优化。这就是为什么在fx图的tracer中调用recompile,在dynamo中也会调用recompile,因为在dynamo中转换得到的output是gm和fx图中的gm都是graphmodule,内部有recompile。
2.2.2.初始化计算图
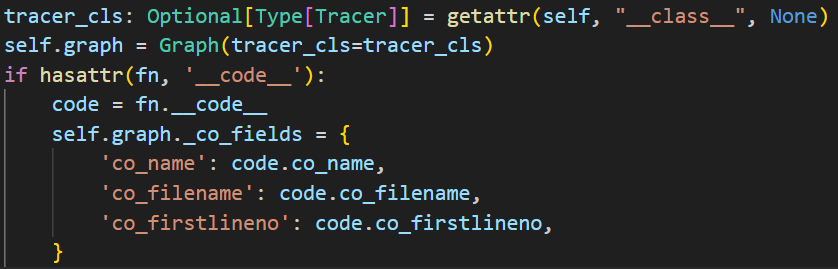
填写基本信息,包括tracer的类型(可能是jit.tracer、fx.tracer或者自定义tracer等等)、以及其他元信息。
2.2.3.构建张量到属性名的映射
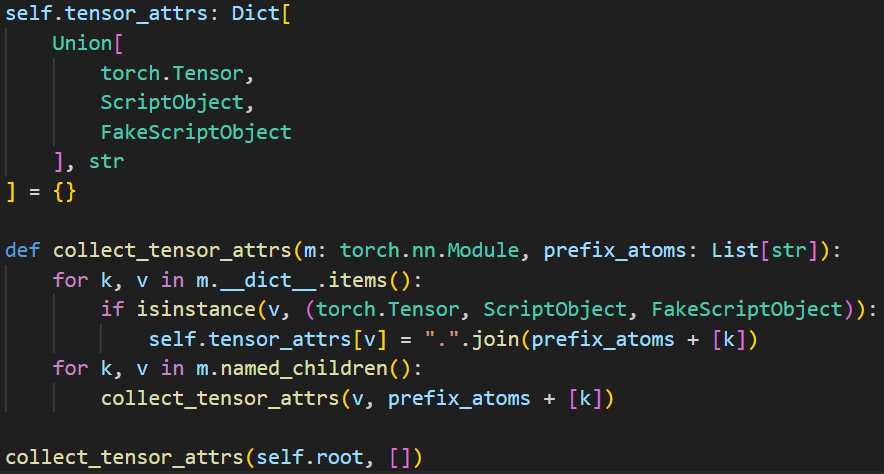
收集模块中所有 Tensor 及其对应的属性路径,并将这些信息存储在 self.tensor_attrs 字典中。
2.2.4.创建参数节点

获得 fn 的全局变量,之后用于函数和方法的 Monkey Patch。
调用 self.create_args_for_root ,为 fn 的参数创建计算图节点。
def create_args_for_root(self, root_fn, is_module, concrete_args=None):
        """
        Create ``placeholder`` nodes corresponding to the signature of the ``root``
        Module. This method introspects root's signature and emits those
        nodes accordingly, also supporting ``*args`` and ``**kwargs``.
        """
        # In some cases, a function or method has been decorated with a wrapper
        # defined via ``functools.wraps``. In this case, the outer code object
        # will likely not contain the actual parameters we care about, so unwrap
        # the function to get to the innermost callable.
        fn_for_analysis = inspect.unwrap(root_fn) # 装饰器包装的原始函数
        co = fn_for_analysis.__code__
        total_args = co.co_argcount + co.co_kwonlyargcount
        orig_args = list(co.co_varnames)
        names_iter = iter(co.co_varnames)
        args: List[Any] = []
        skip_arg_idx = 0
        if is_module:
            if total_args == 0:
                raise RuntimeError(
                    "``self`` argument cannot be part of *args expansion!"
                )
            skip_arg_idx = 1
            next(names_iter)  # skip self
            args.append(self.root)

        sig = inspect.signature(fn_for_analysis)

        # This covers the very specific case where we are passing in flat
        # concrete_args as a tuple, but our traced fn takes (*args, **kwargs).
        # In this case, just take the concrete_args and pass them through.
        name_idx = 0
        if isinstance(concrete_args, tuple) and \
                len(concrete_args) > 0 and \
                (co.co_flags & HAS_VARSTUFF) and \
                total_args == 1:
            for concrete_arg in concrete_args:
                out = self.create_proxy("placeholder", f"input_{name_idx}", (), {})
                if isinstance(concrete_arg, PHBase):
                    if concrete_arg != PH:
                        # Transfer attrs in the case where you're using a placeholder other
                        # than the singleton PH (PH has no attributes to transfer).
                        # Proxies were created out of the placeholders.
                        # Transfer any metadata (put on the placeholders in the form of
                        # attributes set by the user) from the placeholder to the
                        # underlying nodes (the proxy is unwrapped by the user, but
                        # the metadata should hold).
                        _transfer_attrs(fr=concrete_arg, to=out.node)
                args.append(out)
                name_idx += 1
            return root_fn, args

        arg_names = [next(names_iter) for idx in range(skip_arg_idx, total_args)]
        if isinstance(concrete_args, tuple):
            if len(arg_names) != len(concrete_args):
                raise RuntimeError(
                    f"Tracing expected {len(arg_names)} arguments but got {len(concrete_args)} concrete arguments"
                )
            concrete_args = dict(zip(arg_names, concrete_args))

				#
        def proxy_placeholder(name):
            return self._proxy_placeholder(name, concrete_args, sig, fn_for_analysis)

        args.extend(proxy_placeholder(names) for names in arg_names)

        if co.co_kwonlyargcount > 0 or co.co_flags & HAS_VARSTUFF:
            # TODO: type annotations for *args and **kwargs
            if co.co_flags & inspect.CO_VARARGS:
                args.append(proxy_placeholder("*" + next(names_iter)))
            if co.co_flags & inspect.CO_VARKEYWORDS:
                args.append(proxy_placeholder("**" + next(names_iter)))
            root_fn = _patch_function(root_fn, len(args))

        flat_args, in_spec = pytree.tree_flatten(tuple(args))
        if not all(child.is_leaf() for child in in_spec.children_specs):
            # In the case that we have pytree-flattened inputs in
            # `concrete_args`, generate a flattening wrapper around the
            # original root function and return that.
            self.graph._codegen = _PyTreeCodeGen(
                _PyTreeInfo(orig_args[:total_args], in_spec, None)
            )

            def flatten_fn(*args):
                tree_args = pytree.tree_unflatten(list(args), in_spec)
                tree_out = root_fn(*tree_args)
                out_args, out_spec = pytree.tree_flatten(tree_out)
                assert isinstance(self.graph._codegen, _PyTreeCodeGen)
                self.graph._codegen.pytree_info = (
                    self.graph._codegen.pytree_info._replace(out_spec=out_spec)
                )
                return out_args

            return flatten_fn, flat_args
        return root_fn, args
- 对输入做了 unwrap;(装饰器会创建新函数替换原始函数,可能不包含原始函数的参数信息)
- 获得原始函数的代码对象 co;
- co.co_argcount 和 co.co_kwonlyargcount 分别记录了 args 之前的参数个数,和 args 之后 **kwargs 之前的参数个数。
- co.co_varnames 记录了函数内所有局部变量的名字,参数也是局部变量,最先被记录。
- 如果是module,也会添加self;
- 获取参数列表arg_names;
- 为arg_names中的所有参数调用proxy_placeholder()并将结果存储到args中。proxy_placeholder的核心是self.create_proxy,创建 placeholder类型的torch.fx.proxy.Proxy:
- 使用 self.create_arg 方法创建参数,将各种类型的输入转为 Node 输出。
-
利用之前的提到的 IR 所有的五个元素创建了一个新的 Node 实例 node,插入计算图中。


-
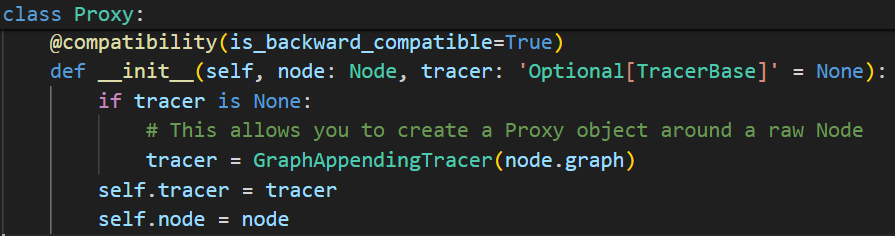
调用 self.proxy 方法创建一个新的 Proxy 实例 proxy,proxy()的self就是tracer,用来初始化Proxy。一个
Proxy其实就是包含了一个Node和一个Tracer。
- 返回root_fn和args
create_args_for_root 做的:
遍历了除 self 之外的参数,为每一个参数都生成了一个 Proxy ,其中每个 Proxy 都包含一个类型为 placeholder 的 Node ,且被插入到计算图中,返回这些Proxy。
假设待追踪的方法是 forward(self, x) ,其中 self 是模块本身, x 是输入,那么返回 args 包含两个元素,第一个是 self ,第二个是 Proxy(x) 。
2.2.5.初始化属性名到 Proxy 的字典

使用parameter_proxy_cache来存储已经生成的Proxy减少重复生成。
2.2.6.可能的叶子函数/方法的monkey patch
trace的时候如何记录每一个函数/模块/方法调用?
e.g.:遇到 x = self.linear(x) ,需要调用 Linear 模块,但是在tracing中并不想真的调用 Linear 模块。所以生成一个计算图节点,描述调用 Linear 模块这个行为。
fx 采用的做法是 monkey patch ,什么是 monkey patch 呢? 就是动态的属性替换,这种替换是在运行时发生的。fx 在追踪时,将 Linear 的 call 方法保存,替换成生成描述调用的计算图节点,返回 Proxy 的函数。追踪完以后,又把这个原来的 call 方法替换回去。
实际上是将外部调用抽象成一个调用call节点插入到计算图中。

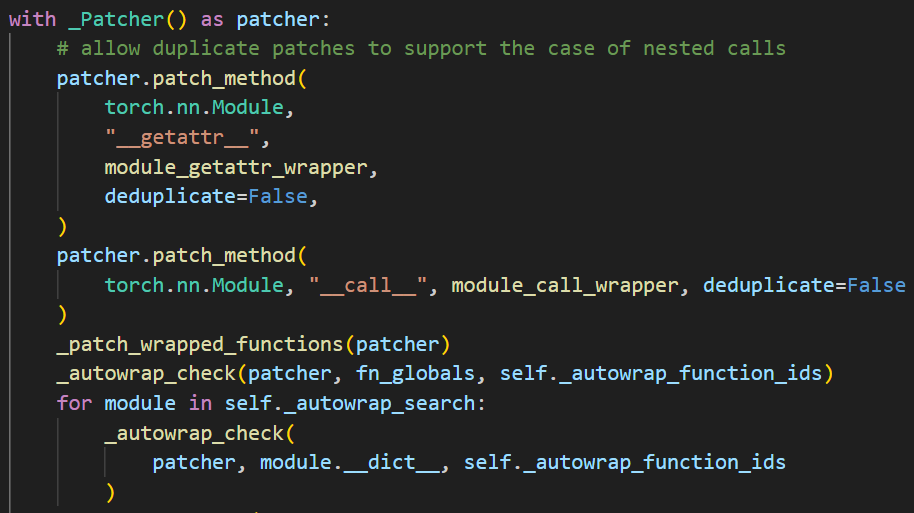
通过with _Patcher() as patcher: 上下文管理来实现这样的功能,在_Patcher类中,有两个主要函数:
- patch():函数名,原函数保存在 patches_made 中,用新的函数替换frame_dict中原有的;
- __exit __():在 with 结束时调用,会调用 patch_made 中所有元素的的 revert 方法,即将被替换的转换回去。
在 fx 追踪的过程中,我们不希望再深入到这些函数和方法内部了,所以直接把这个调用记录成一个计算图节点。例如所有 torch 内置的模块,它们都被视为叶子模块,那么它们的 __call__ 方法,其实就应该被视为叶子方法,需要被 patch。
Monkey Patch和直接创建外部调用节点的区别?
最终结果都是在 Tracer 的计算图中创建一个 call_function 节点,节点中保存被调用的函数和参数。这确保了外部函数调用能够正确地表示为计算图中的节点,并且在后续的图转换和优化过程中能够被处理。
为什么Monkey Patch更好?
1. 简化符号跟踪过程
Monkey Patch 可以直接在符号跟踪期间捕获对函数或方法的调用,而不需要修改原始的代码结构。这使得符号跟踪过程更加简化:
- 透明捕获:通过 Monkey Patch,可以在函数或方法调用时插入自定义逻辑,而不需要修改调用代码。这种方式在符号跟踪期间自动捕获调用并记录到计算图中。
- 减少重复工作:不用为每个外部函数或方法调用单独编写捕获逻辑,只需对特定函数或方法进行 Monkey Patch。
2. 保持代码的透明性和最小侵入性
Monkey Patch 对用户代码的侵入性较小,用户无需修改原始代码即可进行符号跟踪:
- 用户友好:用户代码可以保持不变,符号跟踪逻辑通过 Monkey Patch 动态注入。这对用户来说更加方便,不需要了解符号跟踪的内部细节。
- 降低复杂度:使用 Monkey Patch 可以避免在每个潜在的外部调用点显式地创建节点,从而降低符号跟踪的复杂度。
3. 处理复杂的外部调用
有些外部调用可能涉及复杂的逻辑或依赖关系,通过 Monkey Patch 可以更方便地捕获和处理这些调用:
- 统一处理:通过 Monkey Patch,可以统一处理特定函数或方法的所有调用,而不需要在每个调用点单独处理。可以用参数映射的方式传递参数,而不需要一一对应。因为FX框架要求在创建节点时,参数列表必须与目标函数的签名完全一致。
- 灵活性:可以根据需要在 Monkey Patch 中添加额外的逻辑,如日志记录、输入输出检查等。
4. 可维护性和扩展性
使用 Monkey Patch 可以更容易地进行维护和扩展:
- 集中管理:所有涉及符号跟踪的逻辑可以集中在 Monkey Patch 中进行管理和维护,而不需要分散在多个调用点。
- 方便扩展:如果需要支持更多的外部函数或方法,只需在一个地方添加相应的 Monkey Patch 逻辑即可。
Module.__getattr__ 的 patch
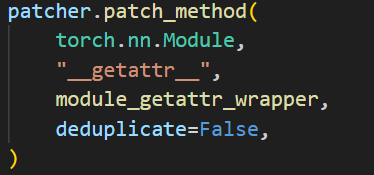
patcher上下文管理中,首先将nn.Module的__getattr __方法替换成module_getattr_wrapper:

getattr做的就是返回属性对应的proxy。
原本的__getattr__方法是在对应的module中寻找名称匹配的方法,而替换成module_getattr_wrapper后,会返回名称对应的proxy,记录调用的目标和参数等信息,并不会执行实际的调用。
operator 的 patch
operator 是 python 的内置模块,提供了一系列与 Python 的内置运算符对应的函数。例如 + , - , * , / 等运算符,等价于 operator.add , operator.sub , operator.mul , operator.truediv 。
对于运算符的patch,在追踪时,遇到一句 x = x + y ,那其实会去调用 x 的 add 方法,所以需要修改 x 的 add 方法。
那么在追踪的时候,x 是什么呢,是 Proxy !所以需要修改 Proxy 类的各种魔术方法。
在 proxy.py 下有这样一段代码:
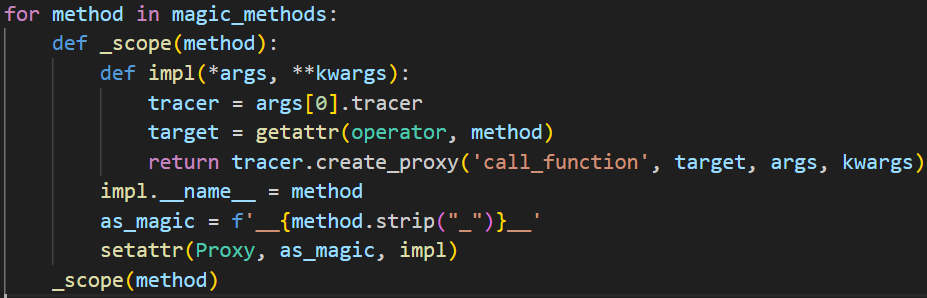
magic_method 内部包含了常见的运算符函数。
tracing的过程中,所有的操作都会被替换为对应的 proxy 对象,包括函数调用和其他语句。
torch 内置函数的 patch
torch 自带了很多函数,例如 torch.sum 和 torch.topk 等。调用这些方法实际上会去调用 Tensor 的 torch_function 方法。
在trace的时候,中间传递的参数是 Proxy ,默认情况下会调用 Tensor 的 torch_function 方法,但是这不是我们想要的。我们可以自定义 Proxy 的 torch_function 方法,这样在追踪时遇到 torch 内置函数,就会去调用 Proxy 的 torch_function 方法,也就完成了 patch 。
proxy.py中自定义Proxy的__torch_function__方法,在符号追踪过程中捕获对张量方法和操作的调用,并将这些调用转换为计算图中的节点,也就是将其转换为proxy。
自定义函数和库函数的 patch
有时用户想在模块中使用自定义函数或者一些库函数 。这个函数的调用也需要被视作一个计算图中的一个节点,fx 提供了一个 wrap 接口给用户来达到这个目的。
@torch.fx.wrap(len)

class MyModule(torch.nn.Module):
    def __init__(self):
        super().__init__()
        ...
    def forward(self, x):
        ...
        l = len(x)
        ...
pytorch/torch/fx/_symbolic_trace.py#L1107是wrap的具体实现:
- 获取需要被 wrap 的函数的名字。
- 获取上一个帧对象
f。什么是帧对象呢,python 虚拟机在调用函数或者导入模块的时候,就会在堆栈中压入一个帧对象。在wrap函数中获取到的当前帧currentframe,它对应着wrap函数的调用。它的上一帧对应的是调用wrap函数的__main__模块。 - 把
f的全局变量字典f_globals和需要被 wrap 的函数的名字fn_name做为键和值添加到了_wrapped_fns_to_patch里面。最后返回了函数。
所以其实 wrap 只是做了一个记录的工作,真实的替换是 fx 追踪开始前做的:

_patch_wrapped_functions处理被包装的方法和全局函数。
为_wrapped_fns_to_patch中的每个方法进行patch,用_create_wrapped_func(orig_fn) 替换了原函数。对方法的处理同理。
_create_wrapped_func 是如何生成新函数:
调用 _find_proxy,在输入中寻找是否存在 Proxy ,
- 如果有一个计算图的节点作为输入,就返回一个 call_function 类型的 Proxy ,
- 否则就只是执行一下原函数,然后返回原函数的返回值,
猜测是为了精简计算图。
模块的 patch
存在一些模块,例如 math ,里面所有的函数都非常的常用,所以 fx 自动的 patch 整个模块。让我们看看 fx 是怎么做的,首先是在 Tracer 初始化的过程中:

参数 autowrap_modules,表示需要自动被 patch 的模块,默认包含了 math 模块。
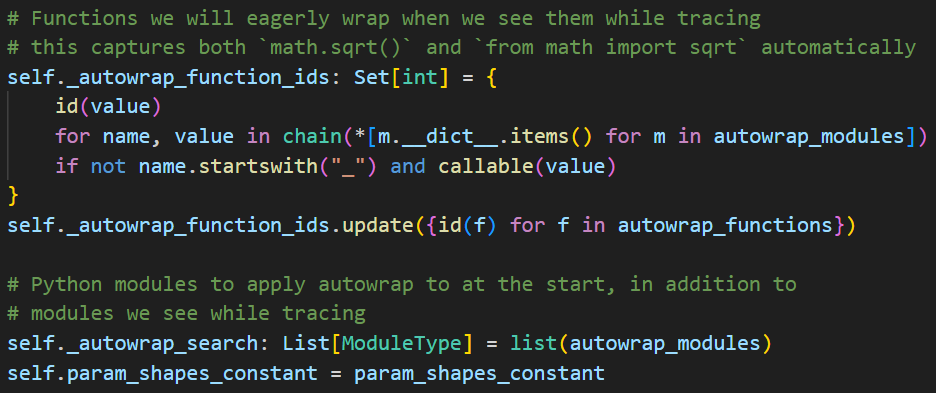
初始化的过程首先会取出所有 math 模块中对外提供的函数,把他们的 id 放到 _autowrap_function_ids 中。然后会把 autowrap_modules 赋值给 _autowrap_search 。
这也是在做记录的工作,所有的 patch 是在 trace 开始之前完成的。
patch 的实现:

这个 patch 核心也是调用 patcher.patch 方法,在 frame_dict 中用新的函数 _create_wrapped_func(value) 替换了 _autowrap_function_ids中的原函数。
两次调用的 frame_dict 分别对应 fn_globals 和 math.dict 。这两种 patch 分别对应于 from math import sqrt; sqrt(x) 和 import math; math.sqrt() 两种情况。
Module.__call__ 的 patch

module_call_wrapper:
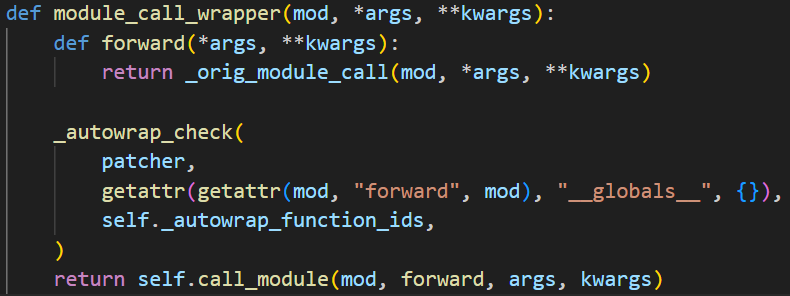
检查被调用模块的 forward 方法中是否有需要被包装的全局函数调用。如果有,它会调用 patcher.patch 方法对这些函数进行包装替换。
因为,当我们进行module.__call__的时候,这个类的内部可能也有调用外部的函数。
接着调用 call_module:
如果这个模块不是叶子模块,则递归的进入模块内部执行追踪;如已经是叶子模块,则直接返回一个 call_module 类型的 Proxy。
2.2.7.trace
在前面已经通过 create_args_for_root 方法,创建了 args 的 Proxy即当前计算图的输入节点 ,tracing的准备工作即patch也已经完成,接下来将 args 传入 fn 执行,执行的过程就是trace的过程。
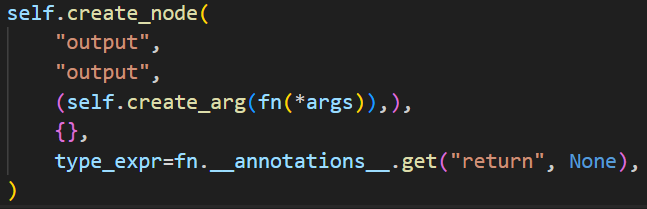
接下来将计算结果作为output节点的值,并创建最后的output节点作为当前计算图的输出。
fx不会对return进行patch,因为假如有语句return x,x之前已经被处理过成为了x的proxy,此时执行fn(*args)的时候遇到return就能直接返回return的结果,即x的proxy给output节点作为值。如果没有return语句,output就是None。
所以说fx做tracing的过程实际上就是:
- 准备参数
- 为所有中间涉及的计算和调用做patch
- 逐条执行函数内部的语句,将其翻译成IR
- 准备output
为什么使用IR而不是AST?主要是因为python是动态语言。
2.3.code gen
刚刚看完了tracer.trace(),接下来看后面的部分。
trace完毕之后,获取root的name,然后使用_make_graph_module由trace得到的graph对象生成graphModule对象。
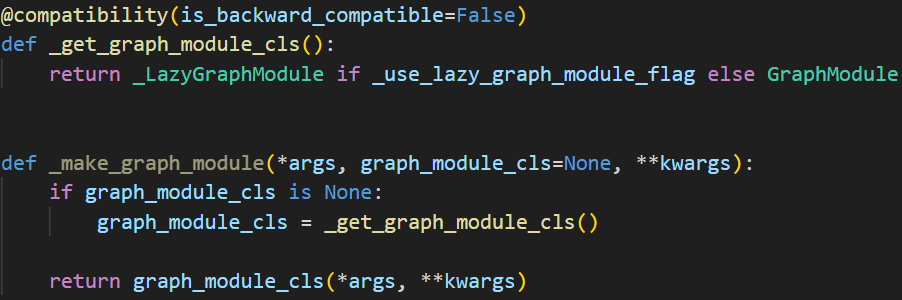
最终会确定对应的类型为GraphModule并调用GraphModule的构造函数,构造函数中重要的是:

对应
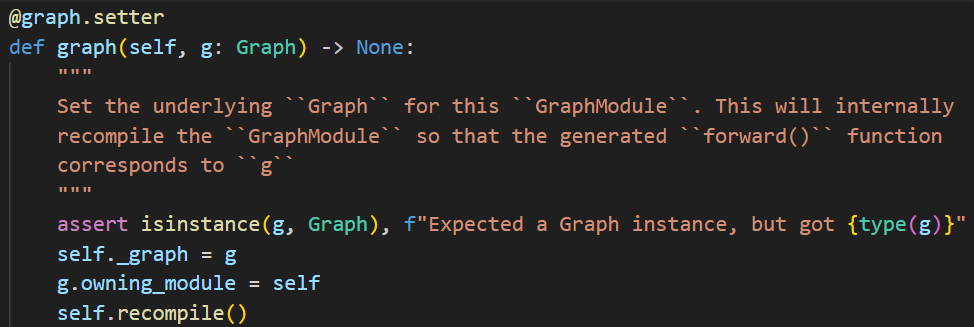
GraphModule中有一个属性_graph用于存储trace得到的graph,然后使用GraphModule的recompile方法来进行CodeGen。
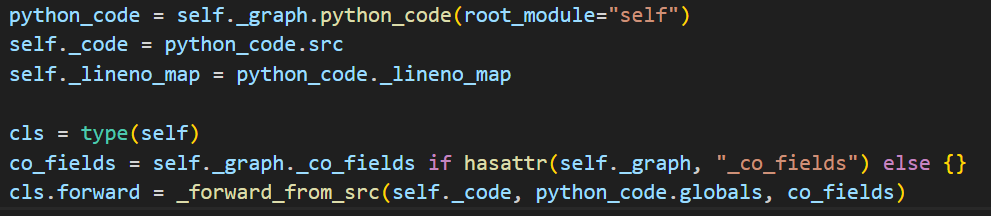
recompile中重要的两条语句:
- self._graph.python_code:生成python代码
- _forward _from_src:生成GraphModule自身forward方法
基本就是遍历计算图每个节点,然后每个节点生成对应的一句 python 源代码就好了。例如 call_function 类型的节点,就会生成类似于这样一句 ${node.name} = ${node.target}(${argsnode.name});。
这部分recompile在dynamo中也使用到了,将含有分支的计算图划分之后,对子图进行编译。
symbolic_trace只是生成IR,优化工作会交给其他组件,比如transform等